
How to Create an ASP.NET Core Web API: Step-by-Step Developer Guide
Building APIs is one of the most important skills for modern software developers.
Whether you are creating a backend for a mobile app, a frontend application, or microservice architecture,
ASP.NET Core Web API provides a fast and scalable solution.
ASP.NET Core is an open-source and cross-platform framework developed by Microsoft for building modern web applications and RESTful APIs.
It offers excellent performance, built-in dependency injection, middleware support, and seamless cloud deployment capabilities.
In this tutorial, you will learn how to create an ASP.NET Core Web API from scratch using .NET 8, Visual Studio, and Swagger.
Why Choose ASP.NET Core Web API?
ASP.NET Core Web API is widely used in enterprise applications because it is lightweight, secure, and high-performing.
It supports Windows, Linux, and macOS platforms.
Key Benefits
- Cross-platform development support
- High-performance REST APIs
- Built-in dependency injection
- Easy integration with Entity Framework Core
- Swagger/OpenAPI support
- Cloud-ready architecture
According to Microsoft documentation, ASP.NET Core is optimized for building fast APIs and scalable cloud applications.
Official Documentation:
ASP.NET Core Web API Documentation
Prerequisites
Before starting, make sure you have the following installed:
- .NET 8 SDK
- Visual Studio 2022 or Visual Studio Code
- Basic understanding of C#
- Postman or Swagger for API testing
Step 1: Create a New ASP.NET Core Web API Project
Open Visual Studio and follow these steps:
- Click Create a new project
- Select ASP.NET Core Web API
- Click Next
- Enter project name
- Select .NET 8
- Enable OpenAPI support
- Click Create
Visual Studio automatically creates a starter Web API project with Swagger integration.
Project Structure Overview
After creating the project, you will see several folders and files.
- Controllers – Handles HTTP requests
- Program.cs – Application configuration
- appsettings.json – Application settings
- Properties – Launch settings
Step 2: Create a Model
Models represent the data structure used in the API.
Create a new folder called Models and add the following class:
namespace DemoAPI.Models
{
    public class Product
    {
        public int Id { get; set; }

        public string Name { get; set; }

        public decimal Price { get; set; }
    }
}
This model represents a simple product entity.
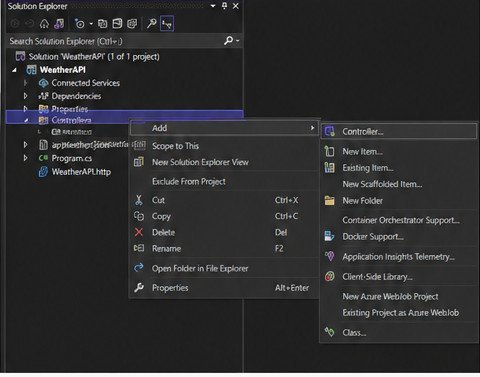
Step 3: Create the API Controller
Controllers handle incoming HTTP requests and return responses.
Create a new controller inside the Controllers folder:
using Microsoft.AspNetCore.Mvc;
using DemoAPI.Models;

namespace DemoAPI.Controllers
{
    [ApiController]
    [Route("api/[controller]")]
    public class ProductsController : ControllerBase
    {
        private static List products = new List
        {
            new Product { Id = 1, Name = "Laptop", Price = 50000 },
            new Product { Id = 2, Name = "Keyboard", Price = 2000 }
        };

        [HttpGet]
        public IActionResult GetProducts()
        {
            return Ok(products);
        }

        [HttpGet("{id}")]
        public IActionResult GetProductById(int id)
        {
            var product = products.FirstOrDefault(p => p.Id == id);

            if (product == null)
                return NotFound();

            return Ok(product);
        }

        [HttpPost]
        public IActionResult AddProduct(Product product)
        {
            products.Add(product);

            return Ok(product);
        }
    }
}
Understanding the Controller
The ApiController attribute enables automatic request validation and API-specific behavior.
The Route attribute defines the API endpoint URL pattern.
The controller contains:
- GET method for retrieving all products
- GET by ID method
- POST method for adding new products
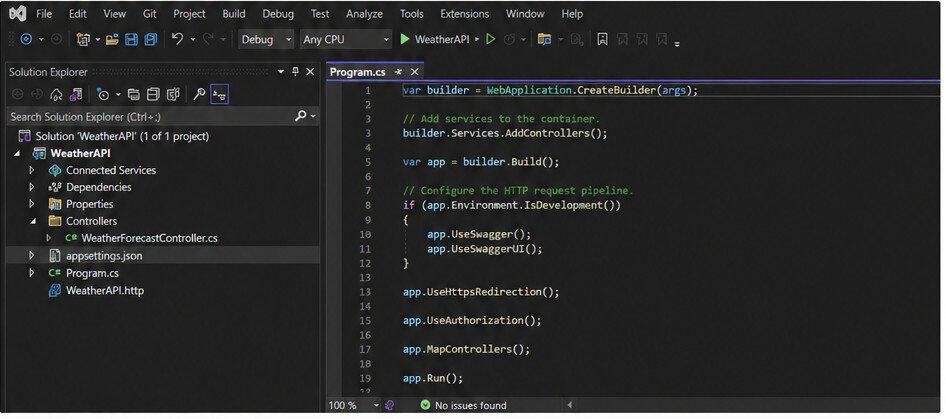
Step 4: Configure Swagger
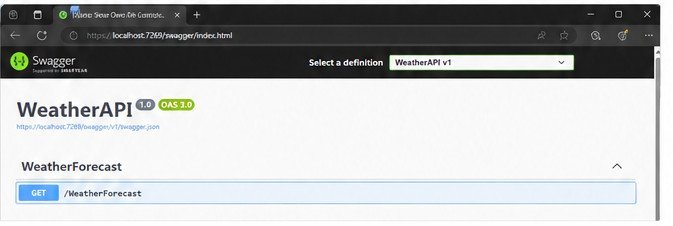
Swagger provides a user-friendly interface for testing APIs directly from the browser.
ASP.NET Core automatically configures Swagger if OpenAPI support is enabled during project creation.
In Program.cs, verify the following code exists:
builder.Services.AddEndpointsApiExplorer();
builder.Services.AddSwaggerGen();

app.UseSwagger();
app.UseSwaggerUI();
Run the application and open:
https://localhost:5001/swagger
You will see all API endpoints available for testing.
Step 5: Run the API
Press F5 or click the Run button in Visual Studio.
The API launches with Swagger UI enabled.
Test the following endpoints:
- GET /api/products
- GET /api/products/1
- POST /api/products
Step 6: Add Dependency Injection
Dependency Injection is one of the core features of ASP.NET Core.
It helps improve maintainability and testability.
Example service registration:
builder.Services.AddScoped<IProductService, ProductService>();
This approach separates business logic from controllers.
Step 7: Add Database Support with Entity Framework Core
Most production APIs use a database instead of static collections.
Install Entity Framework Core packages:
Install-Package Microsoft.EntityFrameworkCore.SqlServer

Install-Package Microsoft.EntityFrameworkCore.Tools
Create a DbContext class and configure SQL Server connection strings inside appsettings.json.
Best Practices for ASP.NET Core Web APIs
1. Use DTOs
DTOs help avoid exposing database entities directly to clients.
2. Implement Logging
Use built-in logging support for debugging and monitoring.
3. Add Validation
Validate incoming requests using Data Annotations.
4. Enable CORS
Configure CORS policies for frontend applications.
5. Use Async Methods
Async programming improves API scalability and performance.
Common HTTP Status Codes
- 200 – Success
- 201 – Created
- 400 – Bad Request
- 401 – Unauthorized
- 404 – Not Found
- 500 – Internal Server Error
Internal Resources
Conclusion
ASP.NET Core Web API is one of the best frameworks for building scalable and secure backend services.
With built-in support for dependency injection, middleware, Swagger, and Entity Framework Core, developers can quickly build production-ready APIs.
In this guide, you learned how to:
- Create a new ASP.NET Core Web API project
- Create models and controllers
- Configure Swagger
- Test API endpoints
- Apply API best practices
Once you understand these fundamentals, you can continue learning authentication, JWT tokens, database integration, and microservices architecture.

