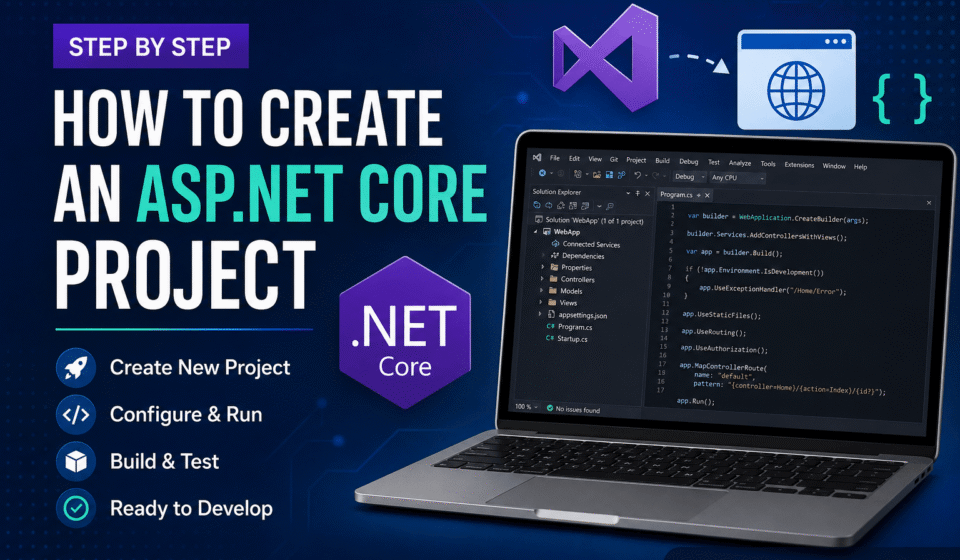

How to Create an ASP.NET Core Project Step by Step for Beginners
Learning how to create an ASP.NET Core project is an important first step for beginners who want to build modern web applications with Microsoft technologies. ASP.NET Core provides a flexible development platform for websites, MVC applications, REST APIs, and cloud-ready solutions. In this guide, you will learn how to create an ASP.NET Core project step by step using Visual Studio, from installing the required tools to running your first application.
The process is simple when you understand what each project setting does. Moreover, following a structured setup helps you avoid common configuration problems later. This tutorial focuses on the traditional Visual Studio workflow shown in the screenshots and explains the purpose of each major step from a developer perspective.
Why Use ASP.NET Core?
ASP.NET Core is widely used because it combines performance, flexibility, cross-platform support, and modern development practices. Developers can build applications that run on Windows, Linux, and macOS. Furthermore, the framework supports web applications, MVC architecture, REST APIs, cloud deployments, and enterprise solutions.
When you create an ASP.NET Core project, you also get a foundation that can grow with your application. For example, a small learning project can later be extended with authentication, database access, dependency injection, logging, caching, and API endpoints. Therefore, understanding the project creation process is useful for both beginners and experienced .NET developers.
- High Performance web applications build karne ke liye
- Cross-platform support
- Modern MVC architecture support
- Cloud-ready applications create karne ke liye
- REST API development ke liye best framework
- Microsoft officially supported framework
Another important advantage is maintainability. ASP.NET Core applications encourage developers to separate responsibilities between controllers, views, services, models, and other components. As a result, teams can manage larger applications more efficiently. The framework is also suitable for containerized and cloud-based deployments, making it useful for modern production environments.
Requirements Before Starting
ASP.NET Core project create karne se pehle ensure karein ki aapke system me following tools installed ho:
- Visual Studio 2019 ya latest version
- .NET SDK
- ASP.NET and Web Development workload
Before starting development, verify that Visual Studio has the ASP.NET and Web Development workload installed. This workload provides the templates and development components required for web application development. Additionally, make sure the installed .NET SDK is compatible with the project version you intend to use.
For production applications, using a supported and stable .NET version is important for security and long-term maintenance. However, beginners should also understand that Visual Studio versions may display different template names and screens. Therefore, the exact options can vary depending on the installed Visual Studio and .NET version.
Step-by-Step ASP.NET Core Project Creation
The following steps explain how to create an ASP.NET Core project using Visual Studio. Each step builds on the previous one, so follow the sequence carefully. If you are new to ASP.NET Core, do not worry about understanding every configuration immediately. First, focus on successfully creating and running the application.
Step 1: Open Visual Studio
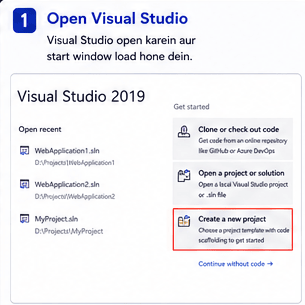
Visual Studio open karein aur start window load hone dein. Visual Studio Microsoft ka official IDE hai jo ASP.NET Core development ke liye widely use hota hai.
Visual Studio provides several tools that make web development easier, including IntelliSense, debugging, project management, NuGet integration, and built-in development servers. Therefore, it is a practical choice for beginners who want to learn the complete ASP.NET Core development workflow.
Step 2: Click on Create a New Project
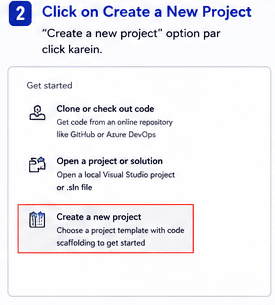
“Create a new project” option par click karein taaki aap naya ASP.NET Core application setup kar sakein.
This screen is the starting point for selecting a suitable application template. Visual Studio offers templates for web applications, APIs, console applications, libraries, and other project types. Choosing the correct template is important because it determines the initial project structure and available configuration.
Step 3: Search ASP.NET Core Web Application
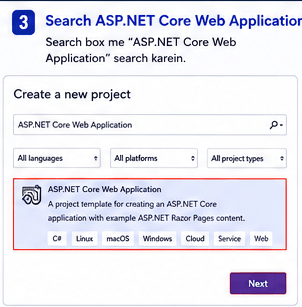
Search box me “ASP.NET Core Web Application” search karein aur matching template select karein.
Template selection deserves attention because ASP.NET Core provides different options for MVC applications, Razor Pages, Web APIs, and other workloads. For this beginner tutorial, select the web application template represented in the provided workflow. In newer Visual Studio versions, the wording may differ slightly, so focus on the ASP.NET Core web application category.
Step 4: Click Next Button
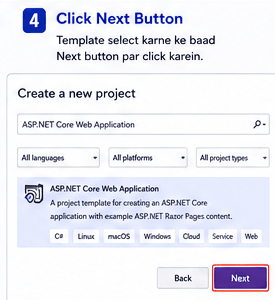
Template select karne ke baad Next button par click karein.
The Next button moves you from template selection to project configuration. At this stage, Visual Studio prepares the settings that identify your application. Take a moment to review each option instead of accepting values without understanding them, especially when working on a real project.
Step 5: Enter Project Name
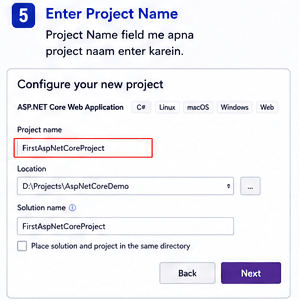
Project Name field me apna project naam enter karein. Example: FirstAspNetCoreProject.
Choose a meaningful project name because it can appear in the solution, assembly, namespaces, and deployment-related configuration. For example, FirstAspNetCoreProject is suitable for practice, while a production application should normally use a name related to its business purpose. Consistent naming also improves readability for development teams.
Step 6: Select Project Location
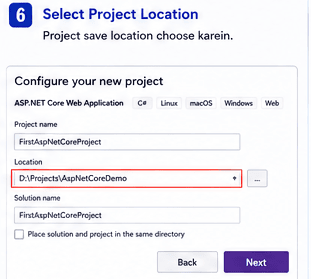
Project save location choose karein jahan aap future me project files access karna chahte ho.
Select a location where you can easily manage and back up your source code. Developers commonly keep projects inside a dedicated development directory. Moreover, avoid storing source code in temporary folders because project files may later be connected with Git or another source control system.
Step 7: Configure Solution Name
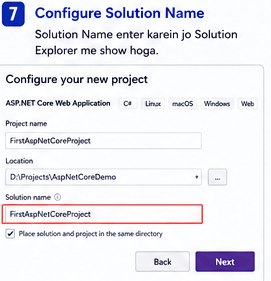
Solution Name enter karein jo Solution Explorer me display hoga.
A solution can contain one or multiple projects. For a beginner application, the solution and project names can be similar. However, enterprise applications often contain separate projects for the web layer, business logic, data access, shared components, and tests. Therefore, learning the difference between a solution and a project is valuable as your applications become larger.
Step 8: Select .NET Core Framework
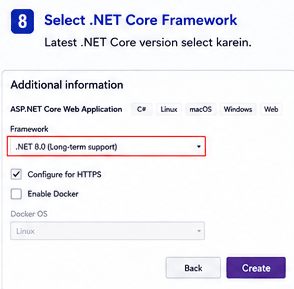
Latest stable .NET Core framework version select karein better security aur performance ke liye.
Framework selection affects application compatibility, available APIs, package support, and long-term maintenance. For a new application, prefer a currently supported stable release that matches your organization’s deployment environment. Also, check package compatibility before upgrading an existing application to a newer framework.
One common mistake is choosing a framework version without checking the installed SDK. If the required SDK is missing, Visual Studio may not display the expected template or may prevent the project from being created. Therefore, verify your development environment before troubleshooting the project itself.
Step 9: Choose Empty Project Template
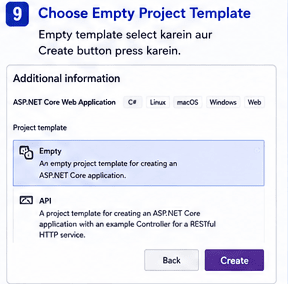
Empty template select karein aur Create button press karein.
An empty template gives beginners a useful view of how the application is configured because fewer files are created automatically. This approach can help you understand controllers, views, routing, and application startup instead of relying completely on generated code.
Step 10: Add Controllers Folder
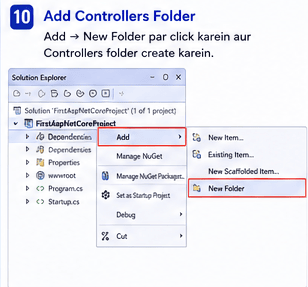
Add → New Folder par click karein aur Controllers folder create karein.
The Controllers folder provides a clear location for MVC controllers. A controller receives HTTP requests, coordinates application logic, and selects the appropriate response or view. Keeping controllers organized becomes increasingly important when an application contains many features and endpoints.
Step 11: Add MVC Controller
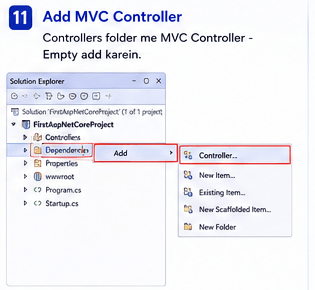
Controllers folder me MVC Controller – Empty add karein.
An empty controller gives you a clean starting point for understanding MVC request handling. In a production application, controllers should generally remain focused on request coordination rather than containing large amounts of business logic. Instead, complex operations can be moved into appropriate services or application layers.
Step 12: Create HomeController and Add View
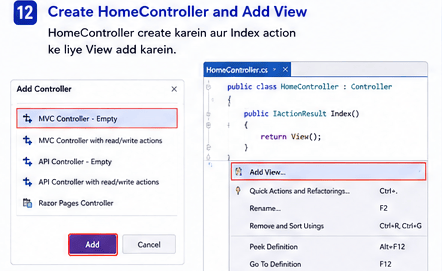
HomeController create karein aur Index action ke liye View add karein.
The HomeController commonly acts as the entry point for a basic MVC application. Its Index action can return the corresponding view, which is normally used to display the application’s initial page. Understanding this controller-to-view relationship is essential before moving toward more advanced MVC concepts.
When troubleshooting a missing page, check the controller name, action name, view location, and routing configuration. A mismatch between these components can result in routing errors or a page that cannot be found. Therefore, consistent naming conventions are important for reliable MVC development.
Step 13: Configure Startup.cs and Run Application
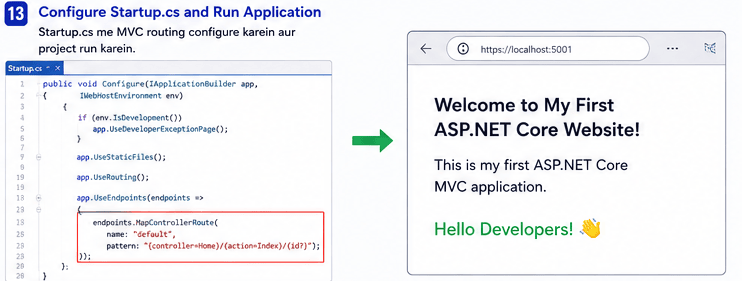
Startup.cs me MVC routing configure karein aur project run karein. Browser automatically open hoga aur aapka ASP.NET Core application successfully run ho jayega.
Application startup configuration controls how incoming requests are processed and how MVC services and routing are connected. Depending on the .NET version, startup configuration may use Startup.cs or the newer Program.cs approach. The important concept is that the application must register the required services and configure the request pipeline correctly.
After running the application, test the URL shown by Visual Studio and confirm that the HomeController and Index view respond correctly. If the browser does not open, review the Visual Studio output window, application logs, selected startup project, and configured launch settings. These checks are useful troubleshooting steps for beginners.
For production environments, additional considerations become important, including HTTPS, authentication, authorization, secure configuration, logging, exception handling, dependency injection, database performance, and deployment settings. Therefore, successfully running the first application is only the beginning of the ASP.NET Core development journey.
Common Mistakes When Creating an ASP.NET Core Project
Beginners often face problems because the required SDK or Visual Studio workload is missing. Another common issue is selecting a project template that does not match the application’s intended architecture. Therefore, always confirm the framework version, installed workload, project type, and application structure before adding custom code.
Developers should also avoid putting database queries, business rules, and large processing operations directly inside controllers. As the application grows, this approach makes testing and maintenance difficult. Instead, use suitable services and clear separation of responsibilities. This practice improves scalability and makes future changes easier.
Best Practices After Creating Your First Project
Once you create an ASP.NET Core project successfully, add source control as early as possible. Git can help you track changes, create branches, and recover previous versions of your application. Additionally, keep configuration values such as connection strings and environment-specific settings outside hard-coded application logic whenever possible.
You should also learn dependency injection, middleware, routing, model binding, validation, logging, authentication, and authorization. These concepts form the foundation of professional ASP.NET Core development. Furthermore, testing your application locally before deployment helps identify configuration and routing problems earlier.
Conclusion and Next Step
ASP.NET Core modern web development ke liye powerful framework hai. Agar aap regular practice karte ho aur MVC architecture properly samajhte ho, to aap professional web applications aur APIs easily build kar sakte ho.
Now that you understand how to create an ASP.NET Core project, the next step is to learn how its files and folders work together. A strong understanding of project structure will make routing, middleware, controllers, views, services, and database integration much easier to understand. This foundation is especially useful when moving from beginner projects to enterprise applications.
Starting a new project with proper conventions sets the tone for a clean, maintainable software architecture. Follow our structured learning roadmap with ASP.NET Core Tutorial: Complete Guide for Beginners to Advanced. Understand the default setup using ASP.NET Core Folder Structure Explained, configure endpoints in Routing in ASP.NET Core, and set up request processing via Middleware in ASP.NET Core Explained.
If you are preparing for professional .NET development or technical interviews, practice this workflow instead of only reading the steps. Create a small MVC application, add multiple controllers, configure routes, connect a database, and gradually introduce services and authentication. This practical approach will help you understand why each ASP.NET Core component exists.
Official Microsoft ASP.NET Core Documentation
Finally, continue building small applications and improve them step by step. Once you can confidently create an ASP.NET Core project, explore folder structure, routing, middleware, dependency injection, Entity Framework Core, Web API development, authentication, and deployment. Consistent hands-on practice will help you move from beginner-level projects toward scalable and production-ready ASP.NET Core applications.